Optiumus Prime Part I

Over the past three years, I had toyed with the idea of making an Optimus Prime costume for Halloween. Unfortunately, I always think about it all to late, have no time, and end up being something else. This year was the same, except despite the lack of time, I still decided to try to make it.
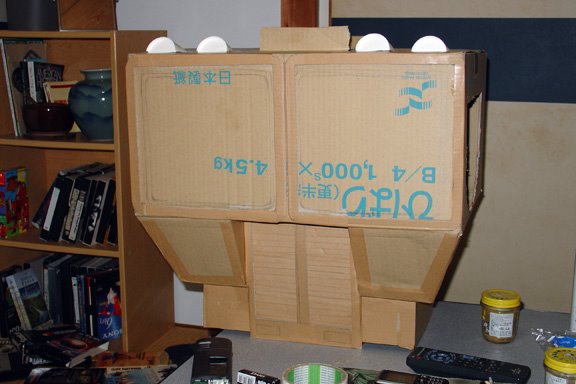
The goal: Finish the costume by Friday October 29th. Since there was a Halloween party in Hirado that night, I had to get it done extra early. For anyone that knows me, this was obviously going to be a challenge. I got a few cardboard boxes from the junior high thanks to the groundskeeper Mrs. Kamogawa. She was more than happy to empty packets of paper in the stock room so I could have the empty boxes. She got really excited when I said, "I was making a robot out of them." Cost of the boxes= ¥0.00!
I didn't really start on the costume until the week of the party. (That Tuesday night, to be precise). I drew up some simple schematics after looking at the surprisingly vast amount of homemade costumes on the internet. One of the main features of most of the costumes online were the size. Many people actually looked out through the chest window area and made a dummy head. Then, they either wore stilts or risers to give them an 8-9 foot height briefly thought about this, but after factoring in maneuverability, the fact that I would be at a party in this thing (probably drinking), and that I normally hit my head on Japanese doorways, I stuck with keeping it my height.
Tuesday night I built the entire chest portion (minus the shoulders). I was actually very pleased with how quickly the costume was coming along. This was good, because I had to go to conference that Friday and wouldn't be able to work on it Thursday night (I was staying at my JTE's house). That left Wednesday night, some of Friday night, and Saturday during the day to work on it.
At that point my estimates were: Wednesday night: Arms and smokestacks. Friday night: Head and start on legs. Saturday during the day: finish legs, and 2-3 hours for painting.
Wednesday night. I fiddled around with the arms for too long, trying to make a joint mechanism for the elbow. I got too frustrated and started working on the head. For the base structure, I used a construction helmet and some safety goggles. I taped the goggles onto the helmet and started building up cardboard around it. Cost of the hardhat=¥1,750 Cost of the goggles ¥700. (about 108 yen to the dollar). This may seem like a lot, but I was originally considering buying a kids toy helmet that already had a very similar structure. The only problem was it was kind of small, and about ¥3,000. I was very happy to find the construction helmet/goggle combo at a lower cost. One of the biggest problems I encountered with the head was the tape. I was using cardboard packaging tape with a waxy back. While this makes it very easy to get the tape off the roll, it prevents the tape from sticking to itself. It was late, and a very long drive to a hardware store, so I had to make due by strategically placing the tape so it would support the cardboard and attach at multiple points of the helmet. I really had no idea what I would do when I needed to paint everything, as I was now fairly sure that the paint wouldn't take to the waxy part. I decided to worry about that later. I finished up that night with most of the front of the helmet done, including that Mohawk looking thing that Prime has on the top of his head. I was running behind schedule...
Thursday night. I took a break. There was a conference I was going to early on Friday morning. It was a ways away, so I had dinner and spent the night at Mrs. Matsunaga's house, as it was on the way. I ate delicious sushi and sashimi, whilst pondering how I was going to get the costume done in time.
Friday night. I got back from conference way later than I thought I would (9:00ish), plus I was totally burnt out from not having a break all day. I worked a little bit more on the arms and finally got them working. I decided to attach the upper arm to the torso portion with a hinge. This allowed me to get the torso on as well as provide maneuverability. I also, I don't have to figure out how to slip on a shoulder unit while I'm in the costume. With the torso on, I have very little reach, and this method allows me to get completely dressed by myself. After slipping on the torso, I can then slip on the forearm boxes with the gloves. Of course, I would have to put my legs on before any of that. I worked a little bit more on the head but got frustrated because everything was coming apart due to the weak tape. I went to bed around 2:00am with very little done.
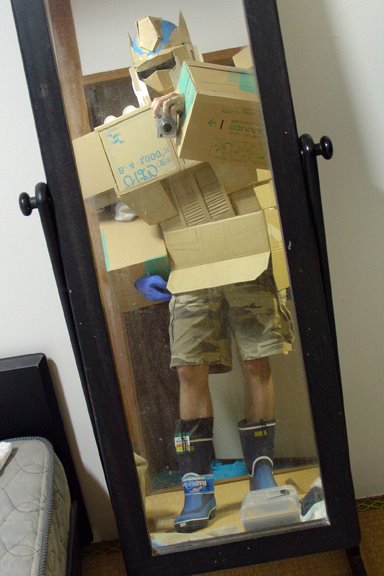
Saturday. I got up around 11:00am and got right back to work. After a while, I figured that driving out to get some better tape would actually save me time in the long run. On my way out I ran into my neighbor Mr. Shoji. I told him what I was doing, and he offered me some Japanese style duct tape (thank God). I went back inside and finished the head in less than an hour. (There is something to be said for having the right materials). At this point, I figured I should start painting base coats since I would only have about 3 more hours of light. I started with the head. Masking off the goggles and mouthpiece, I first hit it with some spray paint, hoping the duct tape would take well to the paint. It didn't work perfectly, but the sun was able to kind of flash-dry it in place, although it did bead up a bit. While I was waiting for that to dry I started on the forearm bracers. My suspicions were confirmed when I saw that the paint was not taking at all to the packaging tape. Suck... I also had some poster paint but it was water-based, so I knew it wouldn't be any better. I lugged the torso outside and started to paint that while I thought about what to do. Now a lot of ideas were running through my head; things like going back to a hardware store and getting some oil-based paints. But, I realized that I was just making it for my friends and I and that I wasn't going to be entering in any contests. I decided to screw it, and just paint it as best as I could. While everything was drying, I started on the legs... I had played around a bit with them during the week, hoping to make them elaborate with the vents and wheels and everything. Given the time restraints, I decided that having legs at all would be better than cool legs that were half done sitting at home. I made them simple and improvised a little. I KNOW that Prime's legs don't have yellow vents, and I KNOW that they have wheels, etc. If I had any inkling of keeping this costume for a while, I would have made them that way. But, there was a good chance that the entire costume would have gotten destroyed that night, and I really didn't care. (By the way, all these disclaimers are for those real Transformer nerds that have googled "Optiumus Prime" and found this blog).
Well to make a long story short, I finished the costume around 10:00pm, drove out to Hirado over an hour away, and partied till 3:30am. I made about 75 people's night, and created about 300 photo opportunities. I'll let you read "Part II" for more about that night. By the way, there are 4 parts so far, so keep your eyes peeled.
A breakdown of the total cost:
Boxes ¥0
Hard hat ¥1,750
Goggles ¥700
Spray paint (¥600 x5) ¥3,000
Poster paint ¥2,000
Boots ¥800
Rubber Gloves ¥400
Tape ¥500
Total ¥9,150 (117 Yen to the Dollar= $78)
Plus I paid ¥3,000 for "all you can drink" at the club.
posted by Origamikid @ 10:59 AM
![]()
![]()

1 Comments:
A lot of work, but as hot as it was, worth the look of it! Good job!
Post a Comment
<< Home